Building Your Dream 10x12 Shed: A Step-by-Step Guide
So, you're thinking about building a 10x12 shed? That's awesome! It's a fantastic project that combines the satisfaction of DIY with the practicality of extra storage space. Maybe you need somewhere to stash your garden tools, a workshop for your hobbies, or just a tidy spot for all that stuff piling up in the garage. Whatever your reason, this guide will walk you through the process, making it easier than you might think.

Planning and Preparation: The Foundation of Success
Before you even think about grabbing a hammer, careful planning is key. This isn't just about throwing some lumber together – you want a sturdy, long-lasting shed. Let's break down the crucial prep work.
Choosing Your Location
Where will your shed live? Consider these factors:
- Accessibility: Will you need a vehicle to transport materials? Is there easy access for loading and unloading?
- Sunlight: Do you need a sunny spot for certain activities (like gardening)? Or do you prefer a shadier location?
- Drainage: Make sure the ground is level and well-drained to prevent water damage. Avoid low-lying areas prone to flooding.
- Local Regulations: Check with your local council or homeowner's association about building permits, setback requirements (how far from your property lines you can build), and any other regulations.
Gathering Your Materials: A Detailed Breakdown
This is where things get exciting (and slightly overwhelming!). Here's a general list. Remember, quantities will vary slightly based on your specific design and material choices. Always buy a little extra to account for cuts and mistakes!
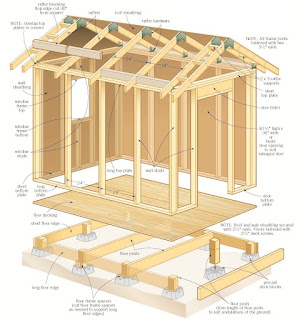
- Pressure-treated lumber: This is crucial for the foundation, framing, and floor. You'll need 4x4 posts for the base, 2x4s for the framing, and 2x6s or 2x8s for the floor joists (depending on your desired floor strength).
- Plywood or OSB sheathing: For the walls and roof. Exterior-grade plywood is recommended for durability.
- Roofing material: Asphalt shingles are a popular and relatively inexpensive choice. Consider metal roofing for longevity.
- Siding: Choose a siding that matches your style and budget. Vinyl, wood, and metal are all options.
- Doors and windows: Measure carefully and select the size and style you prefer. Pre-hung doors are easier to install.
- Fasteners: You'll need a variety of nails, screws, and possibly lag bolts.
- Concrete or gravel: For your foundation. Gravel is a simpler, quicker option, while concrete provides a more stable base.
- Hardware: Hinges, door handles, window latches, etc.
Construction: Building Your 10x12 Shed
With your plan and materials ready, let's get building! This is a simplified overview; detailed instructions can be found in numerous online resources and shed building books.
Laying the Foundation
A solid foundation is the cornerstone of a sturdy shed. Whether you choose concrete or gravel, ensure the ground is level and compacted. For a concrete foundation, create a level formwork and pour the concrete. For a gravel base, create a level bed of compacted gravel, at least 4-6 inches deep.
Framing the Floor
Once your foundation is set, install the floor joists. Space them evenly (usually 16 inches on center) and secure them to the foundation using anchors or brackets. Then, attach your plywood or OSB sheathing to create a solid floor.
Raising the Walls
This step requires careful measurement and precision. Assemble the wall frames on the ground, then lift them into position and secure them to the floor and each other. Use corner bracing for extra strength and stability. Once the walls are up, add your sheathing.
Installing the Roof
Roof construction depends on your chosen design (gable, shed, etc.). Build the roof trusses or rafters according to your plans, carefully measuring and cutting. Attach them securely to the top plates of the walls. Finally, install your roofing material, ensuring proper overlapping and sealing.
Adding the Finishing Touches
Now for the fun part! Install your siding, doors, and windows. Add any trim or molding for a more polished look. Consider adding shelves or other internal features to maximize storage space.
Finishing Up and Maintenance
Congratulations! You've built your own 10x12 shed. Give yourself a pat on the back. Now, a few final steps:
- Clean-up: Remove all debris and leftover materials.
- Inspection: Check your work for any loose nails, gaps, or other issues.
- Sealing and Painting (Optional): Apply a sealant to protect your wood from the elements. Paint or stain to customize your shed's appearance.
Regular maintenance will prolong your shed's lifespan. Inspect it periodically for any damage, and address any issues promptly.
Frequently Asked Questions
Building a shed often brings up many questions. Here are some common ones:
- Do I need a building permit? This depends on your local regulations. Check with your local council or homeowner's association.
- How long will it take to build a 10x12 shed? The time needed varies depending on your experience and the complexity of your design. Expect to spend several weekends, at minimum.
- What tools will I need? A basic set of hand tools (hammer, saw, measuring tape, level) is essential. Power tools (circular saw, drill, etc.) will greatly speed up the process.
- Can I build a shed without experience? While it's certainly a challenging project, with careful planning, following detailed instructions, and potentially seeking help for certain steps, it's definitely achievable for determined beginners.
- How much will it cost to build a 10x12 shed? Costs vary significantly based on materials, location, and your choices. Expect to spend several hundred to several thousand dollars.
- What kind of wood should I use? Pressure-treated lumber is highly recommended for its durability and resistance to rot and insects.
Remember, building a shed is a rewarding experience. Take your time, follow your plans carefully, and enjoy the process. Soon you'll have a beautiful and functional addition to your property!


No comments:
Post a Comment