Building Your Dream Lean-To Shed: A DIY Guide
So, you're thinking about building a lean-to shed? Fantastic! It's a rewarding project, perfect for adding extra storage space or a workshop area to your property. And the best part? You can totally DIY this! This guide walks you through the process, from planning to the final nail, in a way that's easy to understand, even if you're a complete beginner. Let's get started!

Planning Your Lean-To Shed: Size and Location
Before you even think about picking up a hammer, you need a solid plan. This starts with deciding on the size and location of your shed. How much stuff do you need to store? A small lean-to might only need to be 6 feet wide and 8 feet deep, while a larger workshop could easily be twice that size. Consider the items you'll be storing to determine appropriate dimensions. Don't forget to check local building codes – some areas have restrictions on shed sizes and setbacks from property lines. Measure twice, cut once (as they say!), and make sure you've got ample space for easy access.

Choosing the Perfect Spot
The location of your lean-to is crucial. Think about:
- Sunlight: Do you need a sunny spot for plants or a darker area for tools?
- Accessibility: Will you need to easily access the shed with a wheelbarrow or other equipment?
- Drainage: Avoid areas prone to flooding. Proper drainage is essential to protect your shed from water damage.
- Support Structure: A lean-to requires a sturdy support wall. Is there an existing building, fence, or wall that you can attach it to?
Gathering Your Materials: A Complete List
Now for the fun part – the shopping list! This is a general list; you'll likely need to adjust quantities based on your shed's dimensions. Always buy a little extra – just in case!
Lumber:
- Pressure-treated 4x4 posts: For the base supports (number depends on size and spacing).
- Pressure-treated 2x4s: For the frame, rafters, and supports (adjust quantity based on design).
- Plywood sheathing (exterior grade): To cover the walls and roof.
- Roofing material: Asphalt shingles, metal roofing, or even corrugated plastic sheets are options.
Fasteners & Other Materials:
- Galvanized nails: Various sizes for different applications.
- Screws: For attaching the plywood and other components.
- Concrete mix: For setting the base posts.
- Construction adhesive: For added stability.
- House wrap (optional): For extra weather protection.
- Flashing: To prevent water leakage around the roof.
- Weather stripping: For sealing gaps and preventing drafts.
- Paint or stain (optional): To protect the wood and enhance the look.
Tools You'll Need:
- Measuring tape
- Level
- Shovel
- Post hole digger or auger
- Hammer
- Circular saw or hand saw
- Drill
- Safety glasses
- Work gloves
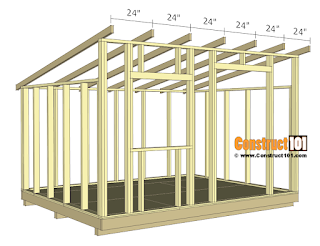
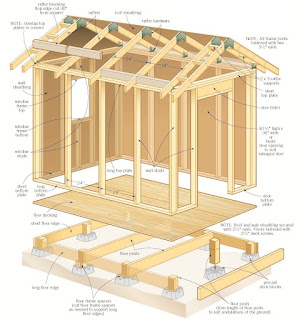
Building Your Lean-To Shed: Step-by-Step
Okay, let's build! Remember safety first. Always wear safety glasses and gloves. Take your time, and double-check your measurements.
Foundation:
Start by digging holes for your 4x4 posts. The depth will depend on your local climate and soil conditions – at least 2-3 feet is usually recommended. Set the posts in concrete, ensuring they're level and plumb (perfectly vertical).
Framing:
Once the concrete has set, attach the 2x4s to form the frame of your shed. This involves creating the walls and roof structure. Use your plan as a guide. Remember that you'll want to consider the slope of your roof for water runoff. A gentle slope is sufficient.
Sheathing:
Next, attach the plywood sheathing to the frame. This creates a solid surface for your roofing material. Ensure the plywood is securely fastened, and use construction adhesive for additional strength and weatherproofing.
Roofing:
Apply your chosen roofing material according to the manufacturer's instructions. This is a crucial step to protect your shed from the elements. Don't forget the flashing around edges and penetrations to prevent water leaks.
Finishing Touches:
Once the roof is on, you can add any finishing touches such as paint, stain, or weather stripping. This will protect your wood and make the shed look great!
Commonly Asked Questions
Here are some questions people frequently ask about building lean-to sheds:
Q: Do I need a permit to build a lean-to shed?
A: It depends on your local building codes. Some areas require permits for structures of a certain size. Check with your local authorities to be sure.
Q: Can I build a lean-to shed on uneven ground?
A: Yes, but you'll need to adjust your foundation accordingly. You may need to use shims or build a level platform to support the frame.
Q: What's the best roofing material for a lean-to shed?
A: Asphalt shingles are a common and relatively inexpensive option. Metal roofing is more durable but can be more expensive. Corrugated plastic sheets are a lighter and more cost effective option.
Q: How long does it take to build a lean-to shed?
A: The time it takes to build a lean-to shed varies depending on the size and complexity of the project, as well as your experience level. A simple lean-to can be built in a weekend, while a more complex project might take several days or even a week.
Q: What if I don't have any construction experience?
A: Don't worry! Plenty of resources are available online and at your local library to help you. Start with simpler projects to build your confidence and skills.
Building a lean-to shed is a fantastic way to add value to your property and gain valuable DIY skills. Remember to always prioritize safety and take your time. Good luck, and happy building!